Ingredients
- 625 grams all-purpose flour
- 450 grams warm water
- 100 grams active sourdough starter
- 13 grams sea salt
Instructions
- Feed your sourdough starter 4-12 hours beforehand until it becomes active and bubbly.
- Mix warm water and flour in a large bowl. Let this mixture rest for 30 minutes to allow the flour to fully hydrate.
- Using wet hands, incorporate the sourdough starter into the flour mixture. Sprinkle salt on top.
- Using your hands, combine the dough for approximately 5 minutes until it comes together. Cover and rest for 30 minutes.
- Perform 6 rounds of stretch and folds: first 3 rounds every 15 minutes, last 3 rounds every 30 minutes.
- Cover dough and allow to bulk ferment until doubled in size. Look for small bubbles on the surface.
- Divide dough into three equal portions. Create tension and form each piece into a ball. Rest for 20 minutes.
- Stretch each piece into a 10x5 inch rectangle. Fold long sides to center, seal seam, then roll seam-side down. Create tension by pulling against counter to elongate to 14 inches.
- Place shaped baguettes in baguette mold or baker's couche. Cover and refrigerate overnight or up to 36 hours.
- Preheat oven to 500°F with baking stone for 1 hour. Place cast iron skillet on bottom rack. Prepare boiling water.
- Remove baguettes from fridge. Score tops with 3-4 deep cuts at 45-degree angle. Fill skillet with boiling water for steam.
- Spritz baguettes with water. Place on baking stone, reduce heat to 450°F, and bake for 35 minutes, rotating at 20 minutes for even browning.
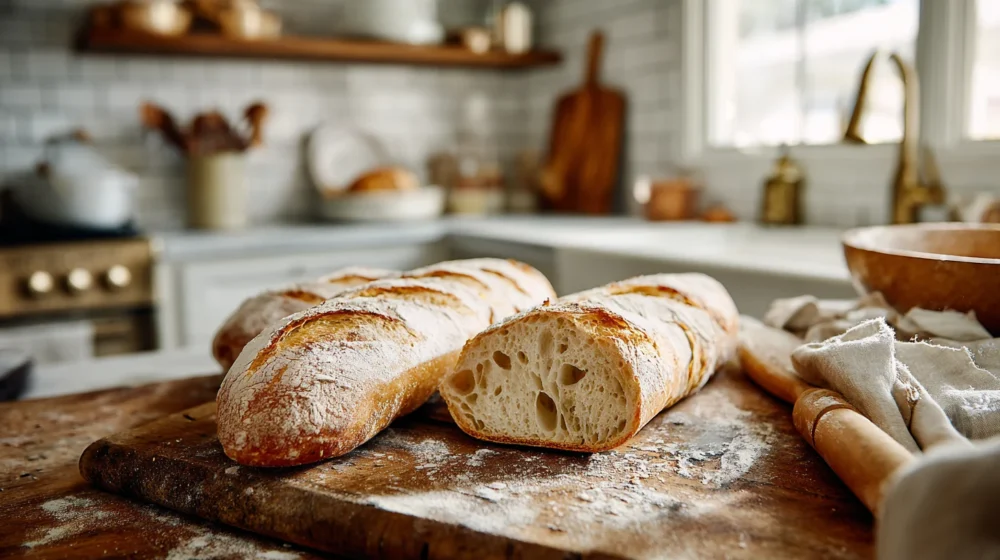
There’s something deeply satisfying about pulling a perfectly golden sourdough baguette from the oven. The sound of the crust crackling as it cools, the aroma that fills every corner of the kitchen, and that moment when you slice into it to reveal the open, airy crumb inside. I’ve been on a sourdough journey for the past few years, and these baguettes have become one of my absolute favorite things to bake.
Unlike the quick breads I grew up making, sourdough baguettes require patience and planning. But here’s what I’ve learned: the wait is always worth it. The wild yeast in the starter creates flavors that commercial yeast simply can’t match. There’s a complexity, a subtle tang, and a depth that makes every bite more interesting than the last.
I remember my first attempt at baguette shaping. Let’s just say they looked more like rustic logs than elegant French bread. The dough was sticky, uncooperative, and seemed determined to stick to everything except itself. But I kept practicing, and now I can confidently say that even imperfect baguettes taste absolutely incredible. The beauty of homemade bread is that it doesn’t need to be picture-perfect to be delicious.
Why I Love Making Sourdough Baguettes
Working with sourdough has taught me to slow down and appreciate the process. These baguettes start with just four ingredients: flour, water, starter, and salt. It’s remarkable how something so simple can transform into something so complex and satisfying. The fermentation process not only develops incredible flavor but also makes the bread easier to digest and more nutritious than conventional bread.
The texture contrast is what really gets me every time. That first bite through the crispy, golden crust gives way to a soft, chewy interior with those characteristic irregular holes. It’s the kind of bread that makes you want to tear off another piece before you’ve even finished chewing the first.
I’ve found that these baguettes work beautifully with both simple and elaborate meals. Sometimes I’ll slice them thick and toast them lightly for breakfast with butter and jam. Other times, I’ll cut them into rounds for crostini when we have friends over. They’re equally at home alongside a simple soup or as part of a more formal dinner spread.
The Process That Makes All the Difference
The autolyse step at the beginning might seem unnecessary, but it’s one of those small details that makes a real difference. Letting the flour and water rest together for 30 minutes allows the flour to fully hydrate and begin developing gluten structure before you add the starter and salt. This makes the dough easier to work with and contributes to better texture in the final bread.
The stretch and fold technique took me a while to master, but once you get the hang of it, it becomes almost meditative. You’re literally building strength into the dough with each fold. I can feel the dough transforming under my hands, becoming smoother and more elastic with each session.
Shaping baguettes is definitely an art form, and I’m still perfecting it. The key is working with confidence and speed. The dough wants to spring back, so you need to create tension quickly and efficiently. Even if your first attempts look more rustic than refined, don’t get discouraged. The flavor will still be outstanding.
Creating the Perfect Crust
The steam created by adding boiling water to the cast iron skillet is crucial for developing that sought-after crispy crust. The moisture allows the bread to expand fully in the oven before the crust sets, creating better oven spring and a more open crumb structure. When the steam eventually evaporates, it leaves behind that beautiful golden, crackling exterior.
I’ve experimented with different scoring patterns, and while the classic diagonal slashes work best functionally, there’s room for creativity here. The cuts need to be confident and fairly deep to allow proper expansion, but the exact pattern can reflect your personal style.
Timing and Planning
One of the things I love about this recipe is how it fits into a relaxed schedule. Most of the time is hands-off fermentation, which means you can start the process in the morning and have fresh baguettes for dinner the next day. The cold fermentation in the refrigerator actually improves the flavor and makes the final shaping easier.
I typically start feeding my starter in the morning, begin the dough around lunchtime, shape the baguettes in the evening, and bake them the following morning. It’s become a rhythm that feels natural and unhurried.
Troubleshooting Common Issues
If your baguettes come out with a pale, soft crust, it’s usually a moisture issue. Make sure you’re creating enough steam in the oven and that your oven is fully preheated. A dense, heavy crumb typically indicates underproofing, so don’t rush the bulk fermentation stage.
Overly sticky dough can be challenging to shape, but resist the urge to add too much extra flour. Wet hands and confidence are your best tools here. The dough will feel different than conventional yeasted doughs, and that’s perfectly normal.
Serving and Storage
Fresh baguettes are best enjoyed within a day or two of baking. I like to store them wrapped in a kitchen towel rather than plastic, which keeps the crust from getting soggy. If they start to get a bit stale, they make excellent bread for French toast or can be sliced and toasted for bruschetta.
These baguettes freeze beautifully too. I often make a double batch and freeze the extras whole. A few minutes in a hot oven brings them back to life with a crispy crust and soft interior.
There’s something deeply rewarding about mastering this traditional technique. Every time I pull a batch from the oven, I’m reminded of why I fell in love with sourdough baking in the first place. The combination of simple ingredients, time-honored techniques, and the magic of wild fermentation creates something truly special.
Whether you’re new to sourdough or looking to expand your repertoire, these baguettes are worth the effort. Take your time, be patient with the process, and don’t worry if they’re not perfect on the first try. The journey of learning to make great bread is just as rewarding as the destination.