Ingredients
- 2 3/4 cups 350 grams all-purpose flour, spooned and leveled
- 1/2 teaspoon kosher salt
- 3/4 cup 180 ml hot water from tap
- 2 tablespoons 30 grams unsalted butter, melted
Instructions
- In the bowl of a stand mixer fitted with a dough hook, combine the flour and salt until the salt is evenly distributed throughout the flour.
- Add the hot water and melted butter to the flour mixture. Mix on low speed until the dough comes together into a cohesive ball.
- Continue mixing for five minutes or until smooth and elastic. If making the dough by hand, knead the dough for about 10 minutes after it comes together.
- Place the dough in a bowl, cover and allow to rest at room temperature for 1 hour. This allows the gluten to relax and makes the dough easier to work with.
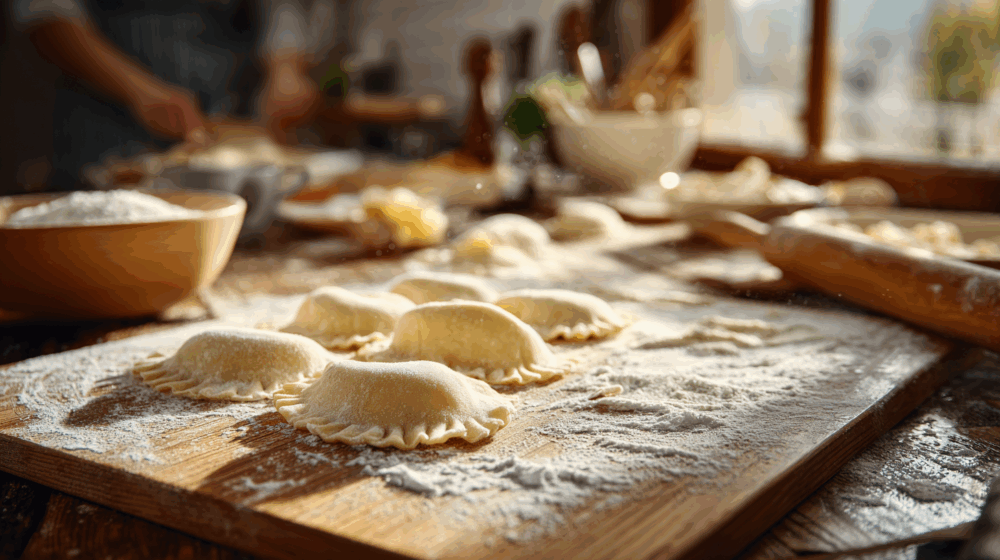
- Divide the dough in half. Lightly flour your work surface and roll out one portion of dough to 1/8 inch (3 mm) thickness. Cut out 3 inch (8 cm) circles.
- Spoon 1 heaping tablespoon of filling into the center of each pierogi circle. Fold the pierogi in half and pinch to seal. Use a fork to imprint around the edges if desired.
- Bring a large pot of salted water to boil. Add the pierogi and cook until they float. Continue cooking an additional two minutes after the pierogi float to the top. Use a slotted spoon to transfer the pierogi to a plate.
There’s something deeply satisfying about making pierogi dough from scratch that connects me to generations of Polish cooks who came before me. I started making these Polish dumplings after spending time with a Polish family, and what initially seemed intimidating has become one of my most cherished kitchen traditions.
The beauty of this pierogi dough lies in its simplicity. With just four basic ingredients that you likely already have in your pantry, you can create perfectly tender dumplings that hold their shape beautifully during cooking. I’ve tested countless variations over the years, and this recipe consistently delivers the soft, pliable texture that makes pierogi-making a joy rather than a struggle.
What I love most about this recipe is how forgiving it is. Unlike some finicky doughs that require precise measurements and perfect technique, this pierogi dough adapts to your kitchen environment and skill level. The hot water creates an incredibly workable texture, while the butter adds just enough richness without making the dough heavy or greasy.
Why This Pierogi Dough Works Every Time
After making hundreds of batches, I’ve learned that the secret to perfect pierogi dough isn’t in exotic ingredients or complicated techniques. It’s about understanding how each component contributes to the final result. The all-purpose flour provides the right amount of structure without being too tough, while the salt enhances the flavor throughout every bite.
The hot water is perhaps the most crucial element that many home cooks overlook. When you add hot water to flour, it begins to soften the gluten strands immediately, creating a more tender final product. You don’t need boiling water—just hot tap water works perfectly. This simple trick eliminates the tough, chewy texture that plagues many homemade pierogi.
I particularly appreciate how this dough handles during the rolling and shaping process. It doesn’t spring back aggressively like some doughs, nor does it tear easily when you’re folding and sealing the dumplings. The one-hour rest period is essential here—it allows the gluten to fully relax, transforming what starts as a slightly stiff dough into something beautifully pliable.
My Kitchen Tips for Success
Through trial and error, I’ve discovered several techniques that make the pierogi-making process smoother. First, I always weigh my flour when possible. Measuring cups can lead to too much flour, which creates a tougher dough that’s difficult to work with. If you only have measuring cups, use the spoon-and-level method rather than scooping directly from the bag.
I prefer using a stand mixer with a dough hook for the kneading process, though hand-kneading works perfectly well if you don’t mind the arm workout. The mixer ensures even development of the gluten without overworking the dough. When kneading by hand, I usually need about ten minutes to achieve the same smooth, elastic texture.
Temperature matters more than you might think. I let the melted butter cool slightly before adding it to prevent cooking the flour, but I keep the water quite warm. This creates the perfect environment for developing a tender dough that’s easy to handle.
Making the Most of Your Dough
One batch of this dough typically yields about thirty three-inch pierogi, though the exact number depends on how thin you roll the dough and how large you cut your circles. I prefer rolling to about one-eighth inch thickness—thin enough to cook evenly but thick enough to hold substantial fillings without breaking.
When cutting circles, I use either a large cookie cutter or even a clean can if I’m in a pinch. The key is maintaining consistent sizes so your pierogi cook evenly. I save all the scraps and re-roll them once, though I avoid rolling the dough more than twice as it can become tough.
For filling, I’ve found that one heaping tablespoon is the perfect amount for most preparations. Too little and the pierogi taste bland; too much and they become difficult to seal properly. Whether you’re using traditional potato and cheese, sauerkraut and mushroom, or sweet fruit fillings, this amount provides the ideal balance.
Storage and Freezing Strategies
This dough is incredibly freezer-friendly, which makes it perfect for batch cooking. I often make a double or triple batch on weekends when I have more time. After shaping the pierogi, I place them on a parchment-lined baking sheet dusted with flour, making sure they don’t touch each other.
Once frozen solid—usually after about two hours—I transfer them to freezer bags where they keep beautifully for up to three months. The best part is that you can cook them directly from frozen. Just add an extra minute or two to the cooking time once they float to ensure the filling is heated through.
Cooked pierogi also store well in the refrigerator for three to five days. I like to reheat them in a skillet with a little butter, which gives them a lovely golden crust that contrasts beautifully with the tender interior.
Beyond Basic Boiling
While boiling is the traditional cooking method, I’ve discovered that the real magic happens after that initial cooking. Once my pierogi have been boiled and drained, I almost always give them a quick sauté in butter until they develop golden spots. This extra step adds textural contrast and deepens the flavor significantly.
Some of my favorite finishing touches include caramelized onions, crispy bacon bits, or fresh herbs. For sweet pierogi filled with fruit, a light dusting of powdered sugar or a drizzle of honey takes them to another level. The neutral flavor of this dough makes it incredibly versatile for both savory and sweet applications.
I cook my pierogi in batches to avoid overcrowding the pot, which can cause them to stick together or cook unevenly. A large pot with plenty of salted water—similar to cooking pasta—gives them room to move freely as they cook.
The Joy of Homemade Tradition
Making pierogi has become more than just preparing dinner in our household—it’s become a way to slow down and connect with something larger than ourselves. There’s a meditative quality to rolling out the dough, cutting perfect circles, and carefully sealing each dumpling. It’s the kind of cooking that encourages conversation and brings people together around the kitchen counter.
I often involve family members in the process, assigning different tasks based on skill level and interest. Even young children can help with the filling and sealing process, though their pierogi might look a bit more rustic than mine. The imperfections don’t matter—they all taste wonderful, and the memories we create are worth far more than perfect presentation.
This recipe has become my go-to foundation for countless variations. Sometimes I add fresh herbs to the dough itself, or experiment with different flours for unique flavors and textures. The basic technique remains the same, but the possibilities for customization are endless.
Whether you’re continuing a family tradition or starting a new one, this pierogi dough recipe provides the perfect foundation for creating something truly special. The simple ingredients belie the sophisticated results, and the process itself is every bit as rewarding as the final product.